Guidelines for authors
Step-by-step guide to format and submit papers to Computo.
1 Introduction
This document provides a comprehensive documentation to accompany the authors during the writing of their contribution to Computo. It covers the requirements for submission, how to use the provided templates, how to set up dependencies, and how to ensure reproducibility through continuous integration and finally.
- Using official templates (R, Python, Julia):
- Create a new GitHub repository from the appropriate template
- This contains document, environment and CI configuration files
- Continuous Integration (CI):
- CI automatically builds and publishes HTML/PDF outputs to GitHub Pages.
- Via the github page of your repository:
- Select “GitHub Actions” under
Settings > Pages - Tick the box “Use your Github page Website” is the “About” section
- Select “GitHub Actions” under
- Local Setup:
- Clone the repository.
- Use
quarto renderto ensure you can build the HTML and PDF versions of the manuscript locally.
- Writing Your Contribution:
- Main content goes to
main.qmd. - Metadata (title, authors, abstract, etc.) is set in
_quarto.yml. - Edit using any text editor or IDE (VS Code/RStudio/Positron recommended).
- Main content goes to
- Dependencies:
- Freeze package versions for reproducibility.
- Use
renv(R),micromamba/environment.yml(Python), orProject.toml(Julia). - System dependencies can be installed via
setup-env-ci.shandsetup-render-ci.sh.
- Publishing:
- Push changes to GitHub; CI will build and deploy the site.
- Ensure that both PDF and HTML versions render correctly.
- Submit the PDF and repository link to OpenReview.
- Ensure that the HTML is publicly accessible for reviewers on the GitHub Pages site.
2 Step-by-step guide
Submissions to Computo require both scientific content (such as equations, code, figures, and data) and clear evidence that this content is reproducible. This is achieved through: i) a notebook system, ii) a virtual environment with frozen dependencies, and iii) continuous integration. If needed, large data files can be stored externally on platforms like Zenodo or OSF.
A Computo submission is therefore a Git(Hub) repository containing:
- the source files for the notebook (a Quarto
.qmdfile, a BibTeX.bibfile, and any static files such as figures or small.csvdata tables); - configuration files to set up dependencies in a virtual environment;
- configuration files to enable continuous integration and render the final documents.
2.1 Setup a git repository from a Computo template
The Computo organization provides template repositories for R, Python, Julia contributors.
These templates provide a starting point for authors to format their contributions according to Computo’s guidelines. They include the necessary files and configurations to set up a reproducible environment and continuous integration
Git is a versioning tool and GitHub is an online platform owned by Microsoft which provides the service of hosting repositories with all the capabilities of versioning offered by Git.
Computo requires authors to submit their contribution as a GitHub repository. Hence, authors are expected to have basic knowledge of Git. We refer authors to the following online book which is particularly well written: https://happygitwithr.com.
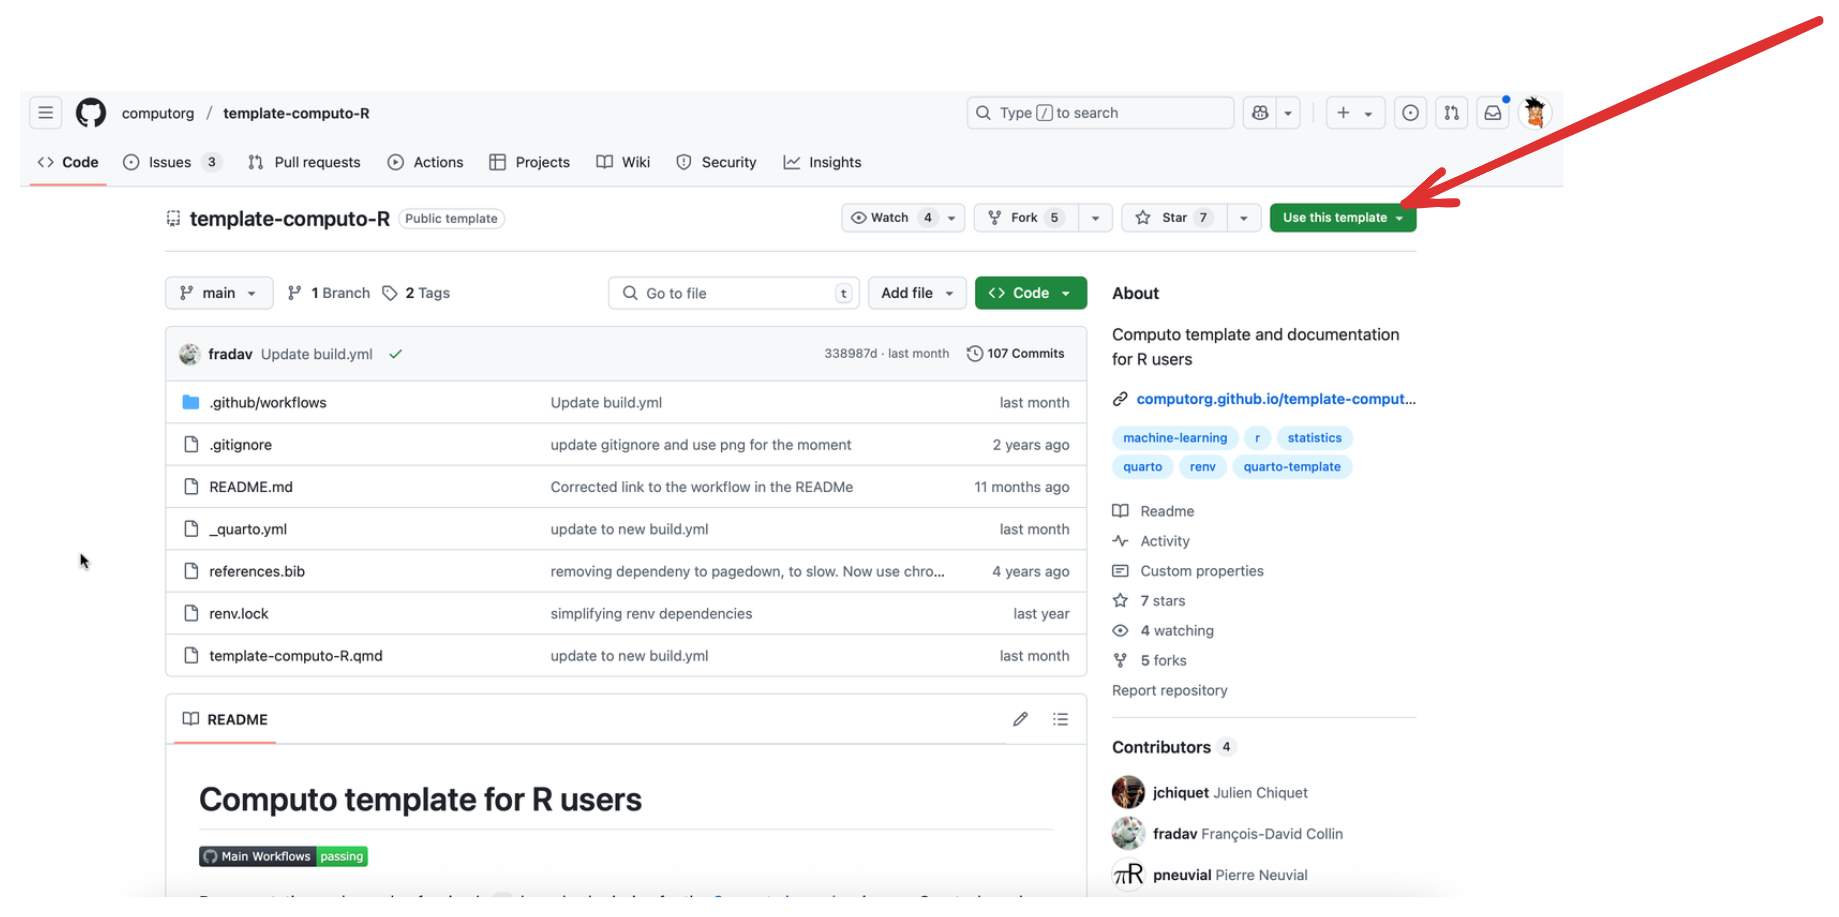
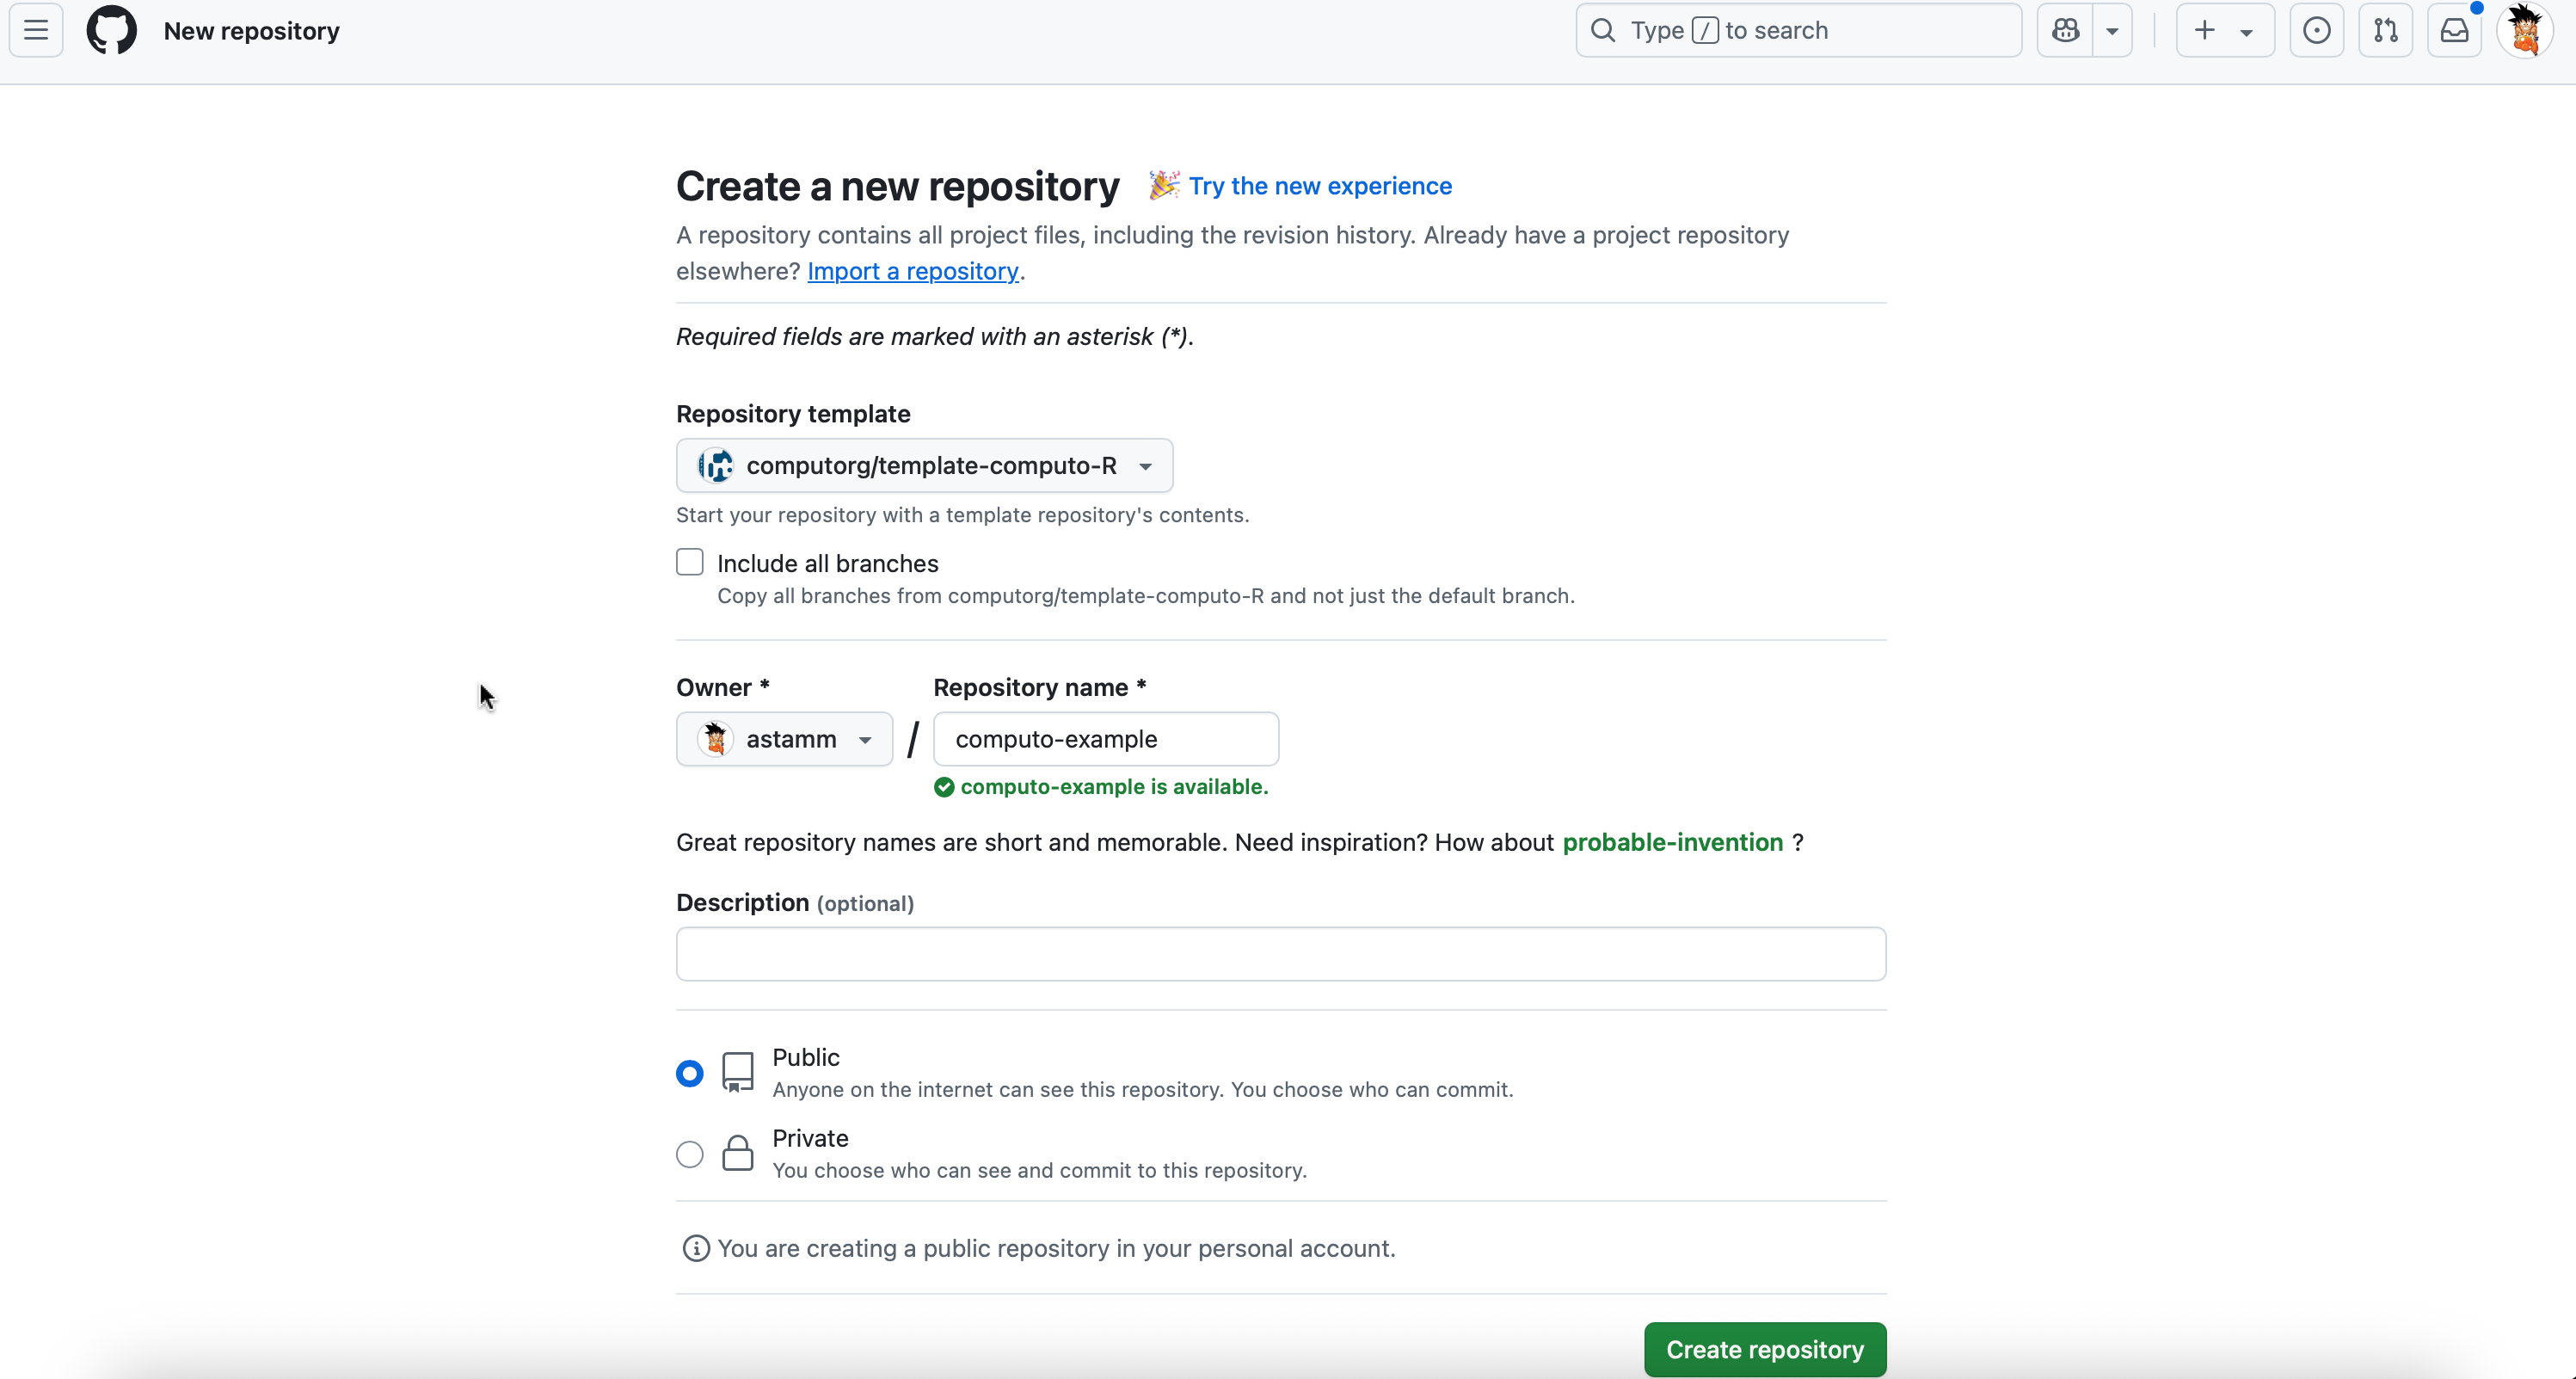
Create a new GitHub repository by navigating to the R, Python, or Julia template repository and clicking the “Use this template” button at the top of the page, as shown in Figure 1.
When you create a GitHub repository from a template, GitHub will ask if you want to include all branches (there is a box labeled Include all branches). You do not need to check that box.
The paper will be automatically published online using GitHub pages. This is possible only with public repositories (which is the default behavior when you initialize your repository from this template, see Figure 2). If your prefer, it is fine to keep your repository private during the writing phase. However, we ask you to set it public at the submission stage; so that the paper can be rendered and published online for the reviewers.
2.2 Ensure reproducibility
You need to set up continuous integration via GitHub Actions in order to ensure reproducibility of your work and its publication as a webpage.
2.2.1 Use Computo’s built-in GitHub Action workflow
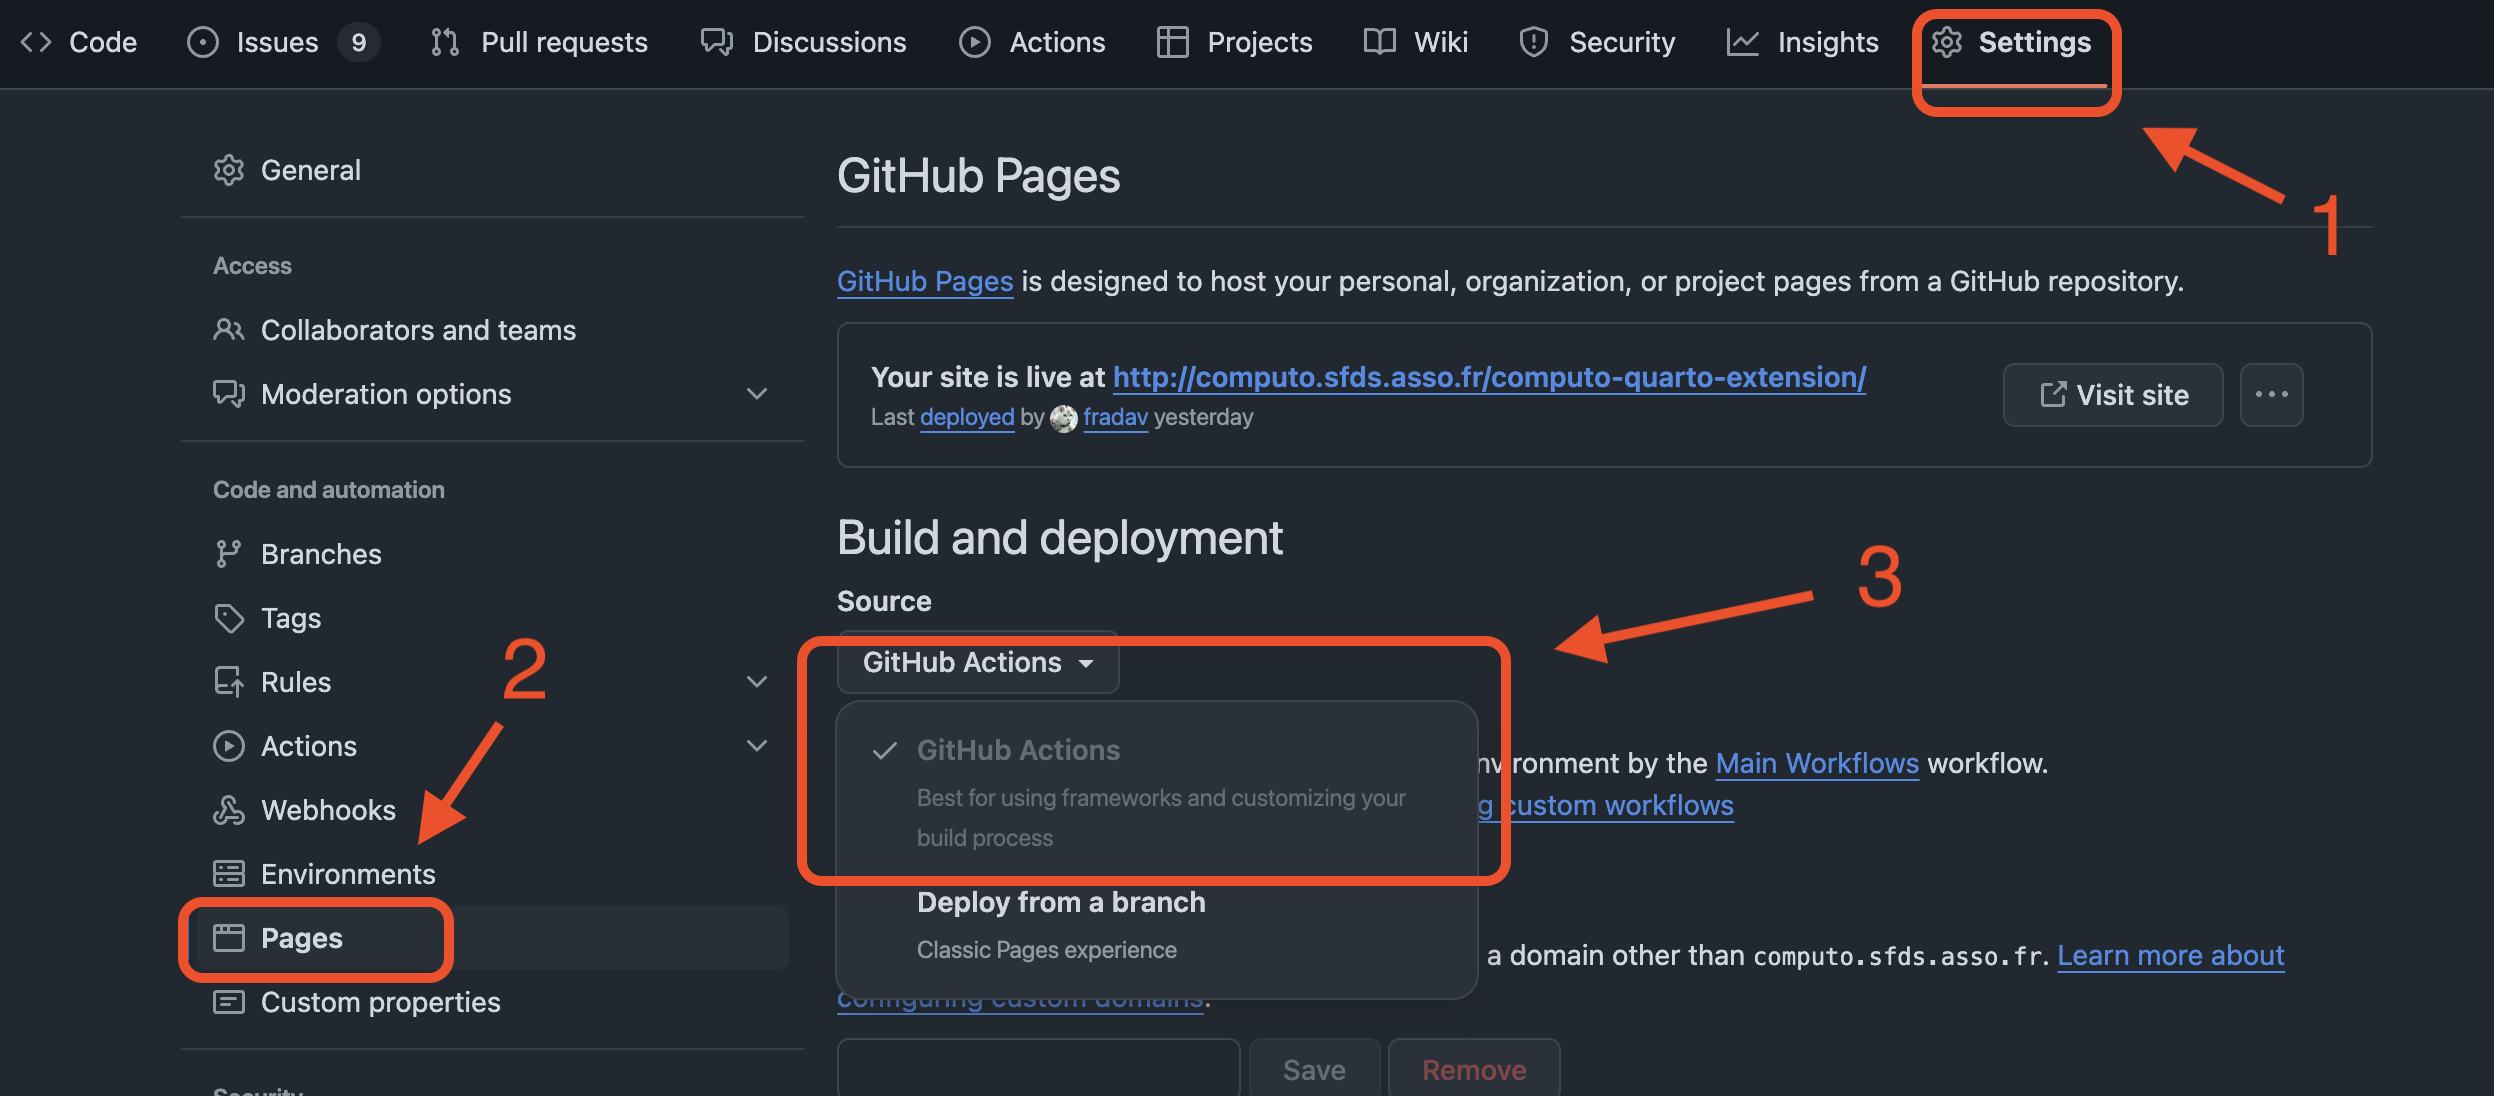
As illustrated in Figure 3, under Settings > Pages on the webpage of your repository, select GitHub Actions as the source in the Build and Deployment section.
Computo has a built-in workflow to ensure reproducibility comes in the form of a YAML file describing a GitHub Action. It should have been automatically added to your repository when you cloned one of our templates. It is located under .github/workflows/build.yml.
Authors should under no circumstances modify this file. If you encounter a problem (such as the CI not completing successfully), please get in touch with us at contact@computo-journal.org.
More details about Computo’s workflow are found in the corresponding FAQ entry.
2.2.2 Check the deployment
To check that everything is working, go to the Actions tab of your repository. You should see a workflow running (yellow wheel spinning). This might take a several minutes the first time. When this is done (green light), you can check that the template has been rendered at the URL <username.github.io/reponame>.
Complete the description of your repository (below the “about” section) by ticking the box labeled “Use your Github page Website” (see image below). This way, anyone visiting your repo can immediately click through to see the rendered manuscript.

2.3 Local setup: clone, quarto, and computo extension
First, clone the repository to your local computer. In a terminal, run:
# Clone the repository
git clone git@github.com/<user-name>/<repository-name>.gitMake sure you clone using the SSH version of the URL, not HTTPS. This will save you authentication headaches later on.
You need to have Quarto and the Computo extension installed.
- To install Quarto, follow instructions at https://quarto.org/docs/get-started/.
- Once Quarto is installed, open a terminal in the directory of the cloned repo and run:
# Install computo quarto extension
quarto add computorg/computo-quarto-extension
If you are collaborating with others when writing your contributions, each collaborator needs to perform these same three steps (clone the repository, install Quarto and install the Computo Quarto extension).
Before proceeding to the next step, make sure that you are able to build your manuscript as a standard notebook on your system by running the following command in a terminal:
# will render both to html and PDF
quarto render
2.4 Writing your contribution
There are mainly two files you are expected to modify in your repository for writing your contribution: main.qmd and _quarto.yml. These files should not be renamed.
2.4.1 Metadata of your contribution
The metadata of your contribution (title, authors, affiliation, date, abstract) should be placed in the _quarto.yml file, which by default looks like this:
project:
  type: default
  render:
    - main.qmd
    - README.qmd

title: "Template for contribution to Computo"
subtitle: "Example dedicated to `R` users"
author:
  - name: Jane Doe
    corresponding: true
    email: janedoe@nowhere.moon
    url: https://janedoe.someplace.themoon.org
    orcid: 0000-0000-0000-0000
    affiliations:
      - name: Name of Affiliation one
        department: Statistics
        url: https://someplace.themoon.org
  - name: John Doe
    email: johndoe@nowhere.moon
    url: https://johndoe.someplace.themoon.org
    orcid: 0000-0000-0000-0000
    affiliations:
      - name: Name of Affiliation two
        department: Computer Science
        url: https://someplace.themoon.org
date: last-modified
date-modified: last-modified
abstract: >+
  Template for preparing a submission to Computo, using the [quarto journal extension](https://github.com/computorg/computo-quarto-extension), the knitr kernel (R user) and [renv](https://rstudio.github.io/renv/articles/renv.html) to set up the dependencies.

  For a detailed, step-by-step guide on preparing your article, setting up the continuous integration and submitting it to Computo, please consult the [guidelines for authors](https://computo-journal.org/site/guidelines-authors.html).
keywords: [key1, key2, key3]
bibliography: references.bib
github-user: computorg
repo: "template-computo-r"
status: "submitted"
citation:
  type: article-journal
  container-title: "Computo"
  issn: "2824-7795"
  doi: "10.5072/computo.0000" # placeholder DOI (10.5072 is the official DOI test prefix), replace once assigned
license: CC-BY-4.0
format:
  computo-html: default
  computo-pdf: default
You can customize most of the entries in that file except status:, license: and format:. These entries will be edited by the associate editors if your contribution is accepted for publication.
2.4.2 Main content of your contribution
The main content of your contribution must be written in the main.qmd file (see formatting suggestion therein). To compile your contribution, run quarto render.
We also provide a README.qmd file as part of the project, which is used by the Computo team to generate a README.md for accepted papers. Please do not modify this file.
2.5 Setup dependencies
The next step is to inform Computo of the other packages, tools and environment that your paper might depend upon. It is important to freeze their versions to ensure reproducibility. This step is inherently handled differently whether you are an R, Python or Julia user.
2.6 Handle external system dependencies
While R, Python, or Julia package dependencies should be managed using the appropriate environment tools, your project may also require external system dependencies (such as libraries or command-line tools). These must be installed on the GitHub runner during environment setup or rendering. To handle this, add and customize two scripts at the root of your repository:
setup-env-ci.shis meant to install system dependencies required to set up the environment in the GitHub runner. Here is an example of such a file taken from a published article:
# The CI runs on Linux Ubuntu, here goes system dependencies
# needed at environment setup step
sudo apt-get install -y libcurl4-openssl-devsetup-render-ci.shis meant to install system dependencies required for rendering the paper, like plotting software or running a script to generate data. Here is an example of such a file taken from a published article:
# The CI runs on Linux Ubuntu, here goes system dependencies
# needed at rendering step
sudo apt-get install -y libblas-dev liblapack-devRemember that the GitHub runner uses Linux Ubuntu and therefore software installation is achieved through apt-get. Furthermore, you must precede calls to apt-get with the word sudo to indicate that you wish to run this command as an administrator.
2.7 Push to GitHub
Once you have finished part of your writing and confirmed that the document builds successfully locally, you can push your changes to GitHub as you would with any Git project. If everything is set up correctly, the continuous integration workflow will automatically build and publish the HTML and PDF versions online.
2.8 Submit your manuscript
Once you are satisfied with your manuscript, you can submit it for review. To do so, upload the generated PDF to the OpenReview platform and indicate the corresponding Git repository. This will initiate both the scientific and reproducibility review processes.
Please also ensure that the HTML version of your manuscript is publicly accessible for reviewers on the GitHub Pages site associated with your repository, as explained in Section 2.2.2.
For more details about the review process, see the guidelines for reviewers.
2.9 Accepted manuscript
If your submission is accepted for publication, you will be asked to transfer the ownership of the repository that hosts your paper to the Computo GitHub organization. To do that, you must go on the main page of your repository in a web browser and click on the Settings tab as indicated in Figure 5.
Once inside the settings of the repository, scroll all the way down to the bottom of the page until you see Danger Zone in red color and click on Transfer as indicated in Figure 6.
A new page opens where you need to select Specify an organization or username and write computorg (see Figure 7). Then you type what is asked in the blank box and click on I understand, transfer this repository and you’re all set!
3 Advanced examples
3.1 Mock contributions
In addition to the template repositories that can serve as example papers (see Section 2.1), we provide more in-depth illustrations of the expected content and available features through mock contributions consisting of a complete reworking of the famous t-SNE article.
2008

Visualizing Data using t-SNE (mock contribution)
Laurens van der Maaten and Geoffrey Hinton

Visualizing Data using t-SNE (mock contribution)
Laurens van der Maaten and Geoffrey Hinton
3.2 Previously published papers
For other advanced examples, do not hesitate to explore the source code of any paper already published in Computo to see how the template is used in practice. In particular, reproducing an existing paper published in Computo can be easily done as detailed in the FAQ.
4 Computo’s code of ethics
- Originality
-
- Authors guarantee that their proposed article is original, and that it infringes no moral intellectual property right of any other person or entity.
- Authors guarantee that their proposed article has not been published previously, and that they have not submitted the proposed article simultaneously to any other journal.
- Conflicts of interest
-
- Authors shall disclose any potential conflict of interest, whether it is professional, financial or other, to the journal’s Editor, if this conflict could be interpreted as having influenced their work.
- Authors shall declare all sources of funding for the research presented in the article.
- Impartiality
-
All articles are examined impartially, and their merits are assessed regardless of the sex, religion, sexual orientation, nationality, ethnic origin, length of service or institutional affiliation of the author(s).
- Funding
-
All funding received by the author(s) shall be clearly stated in the article(s).
- Defamatory statements
-
Authors guarantee that their proposed article contains no matter of a defamatory, hateful, fraudulent or knowingly inexact character.
- References
-
Authors guarantee that all the publications used in their work have been cited appropriately.
- Copyright/author’s right/license compliance
-
Authors guarantee that they comply with the usage license of any third party contents/works (code, software, data, figures/images, documents, etc.) that were used to produce their work.